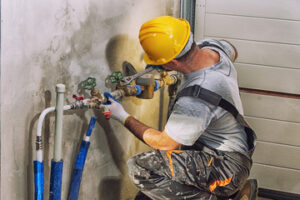
Plumber is a skilled professional who specializes in the installation, repair and maintenance of water systems. They typically work in residential and commercial properties.

This is a physically demanding profession that requires strength and stamina, as well as dexterity to handle tools and parts. Most plumbers are trained through an apprenticeship, which combines classroom instruction with paid on-the-job training.
The valve seat provides the seal between the valve stem and the cylinder head. It is also a vital part of the cooling system, ensuring that the valve is properly cooled when it is open. A faulty valve seat can cause poor gas flow and ineffective compression sealing, resulting in a poor engine performance or even failure. When a valve seat is worn or damaged, it is usually replaced by installing a new valve seat insert. A new seat will provide the proper mating surface for a good compression seal and ensure that the valve is cooled properly when it is opened.
One of the most common causes of failed valve seats is thermal stress. This is caused by the rapid change in operating temperature of the engine and can weaken or crack the valve seat. Seats can also be cracked or damaged by mechanical stresses such as pounding or severe valve lash.
Valve seats are made of a wide variety of materials, including ceramics and plastics. Most metals used for valve seats are hard and strong, but many can be prone to corrosion in certain environments. Ceramics have the advantage of being more durable and chemically inert, but are often not as heat or wear resistant as metal. Plastics are relatively inexpensive, but have lower temperature capability than metals and can be brittle.
Most engine builders use an alloy material for their valve seat inserts, such as a hard steel or alumina. These materials can withstand high pressures, but are less resistant to carbon build-up and oxidation. Another option is to use a powder metal formula that is more difficult to machine, but offers better temperature capabilities and resistance to corrosion than alloys.
When repairing the valve seat, it is important to use a cutter that is slightly smaller than the valve seat insert diameter to avoid over-cutting. It is also important to machine the valve seat counterbore correctly in aluminum heads, using the correct lubrication and spindle speeds. If the valve seat is cut too deep or large, it may cut into the water jacket and potentially damage the head.
Disk Cylinder
A disk cylinder is any set of all tracks of equal diameter in a hard disk drive (HDD). The term “cylinder” can be visualized as an imaginary circle that cuts through all of the platters—the thin circular discs coated on both sides with high-sensitivity magnetic material where data are stored. Most modern HDDs contain multiple platters in order to maximize the amount of data that can be stored in a given volume of space.
Each platter surface is divided into tracks and sectors, a grouping of narrow recording bands. The read-write heads of a hard disk drive move along these tracks, reading and writing data. Tracks and sectors exist on both sides of a platter, but not all surfaces can record data at the same time. A single platter surface can only hold tracks at one point in time, so when the read-write head moves to a different track on another surface, the data is no longer accessible. This is why each platter surface must be populated with tracks at all times, even when the read-write head is not on it.
The concept of a disk cylinder is related to the CHS (Cylinder-Head Sector) addressing mode used by older disk drives. CHS addressing uses a combination of eight bits for the number of heads, and six bits for the number of sectors per track to address the disk geometry.
Because the heads must move between each surface to read or write data, it takes time for the disk’s firmware to complete this task. By placing data that is accessed often together—say, an entire file—into the same cylinder, the firmware can save this movement and increase performance.
Today, most hard disks use logical block addressing to describe how the data is arranged on the platters. The hardware translates LBA addresses into the necessary head movements, but the cylinder concept is slowly being eliminated.
However, the term cylinder is still widely used in the hard disk industry, so if you encounter this terminology in an article or book, it is best to assume it refers to the physical structure of the platters—as opposed to the conceptual meaning of the word in a general computer context.
Disc Cartridge
The cartridge has two opposing discs that have triangular openings that either line up to allow water flow or block the openings preventing water flow. The cartridge also has a stainless steel plate at the bottom that has a crescent shape cut out as it rotates the cutout lines up with a spring-loaded washer to allow the flow of water or with the solid portion of the cartridge to block the flow of water.
To replace a ceramic disc faucet cartridge turn off the water supply and remove the handle of the tap. The cartridge is usually held in place with a retainer nut or clip that can be removed by hand or with a screwdriver. Once the cartridge is removed the seals should be checked for signs of wear and replaced if necessary.
The rubber seals can be cleaned with a nonmetallic scrubber or a sponge to remove sediment buildup and lubricated with silicone spray to help prevent water leaks. Once the new seals are installed and the cartridge is reinstalled turn on the water and test the faucet.
Handle
The handle is the part of a tool that grips and holds it. It can be made of wood, metal or plastic and is often oiled or varnished. Handles are sometimes nicked or cracked by glancing contact with other tools or objects. These nicks weaken a handle and could cause it to fail or in the least leave sharp splinters in the user’s hands. These cracks can be repaired by gluing and reinforcing with a wooden wedge or by removing the broken piece and filing it smooth.
In some cases the handle is spot welded on. Spot welding uses high amounts of current to heat the surfaces and meld them together. It is generally not the best method for repairing handles as it can be difficult to remove from the tool and may not have the same strength as the original handle.
Plumbers need to have some physical strength to be able to lift and maneuver the heavy equipment they use. They also need to have excellent critical thinking skills to be able to weigh possible solutions and their related costs. They also need to be able to interpret blueprints and building codes in order to plan and execute plumbing installations. The most common way to become a plumber is through an apprenticeship, which requires a high school diploma and 4-5 years of training before becoming a journeyman plumber. Another option is to attend a vocational program at a trade school, which can provide a more hands-on approach to learning the trade.